
Emergency Medical Kit for Hiking Dogs: A 2026 Guide
Table of Contents
- Why Your Dog Needs an Emergency Medical Kit on the Trail
- Dog First Aid Kit Contents Checklist: What to Pack
- How to Treat Dog Paw Injuries on the Trail
- Pre-Made vs. DIY: Which Kit Works Best
- Managing Common Trail Hazards and Emergencies
- Emergency Dog Carry Techniques and Trail Evacuation
- Weight and Portability: Building a Field-Ready Kit
- Hydration and Recovery for Working Dogs
Last Updated: August 17, 2026
Why Your Dog Needs an Emergency Medical Kit on the Trail
When your dog is hours from the nearest veterinary clinic, a minor wound becomes a major emergency. At dogsRtreed, we've seen firsthand how quickly trail injuries escalate when you're unprepared. A cut paw, bleeding laceration, or tick exposure can turn a hunting trip or backcountry hike into a dangerous situation if you don't have the right supplies on hand.
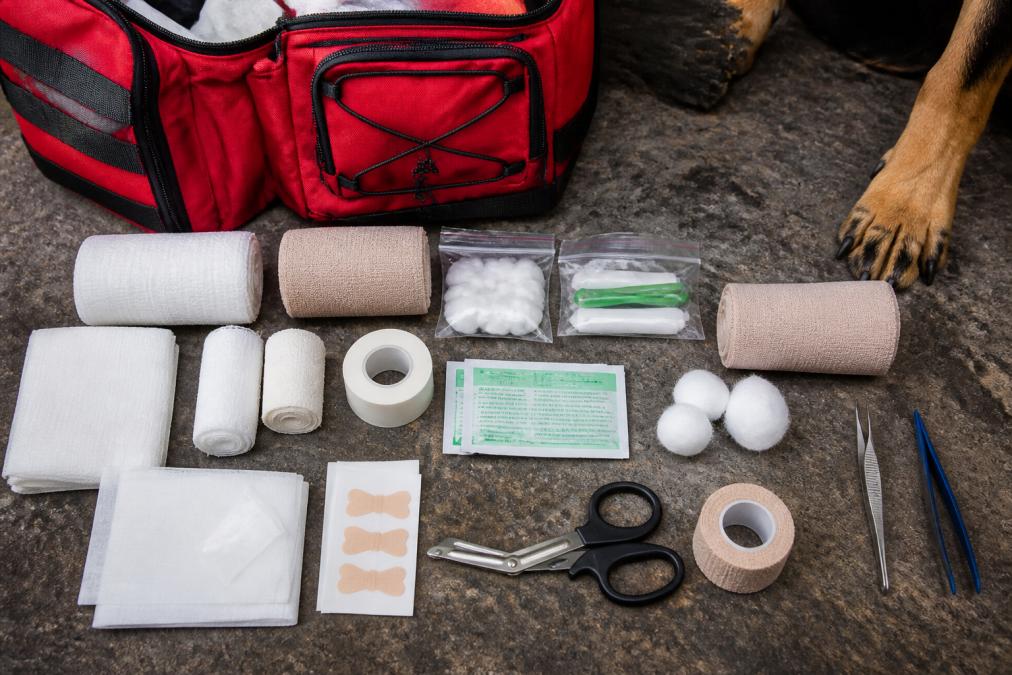
The difference between a manageable field injury and a life-threatening condition often comes down to minutes and preparation. An emergency medical kit for hiking dogs isn't optional gear, it's essential safety equipment that every dog owner venturing into the backcountry should carry. The kit needs to address the specific challenges dogs face on trails: paw injuries from sharp rocks, bleeding wounds, tick exposure, heat stress, and stabilization needs for transport if evacuation becomes necessary.
This guide covers everything you need to build or select an emergency medical kit for hiking dogs that's lightweight, practical, and field-tested. We'll walk you through the essential contents, how to treat common trail injuries, and the decision between pre-made kits and DIY options. Whether you're a weekend hiker or a serious hunting enthusiast with working dogs, the right preparation keeps your canine companion safe when it matters most.
Dog First Aid Kit Contents Checklist: What to Pack
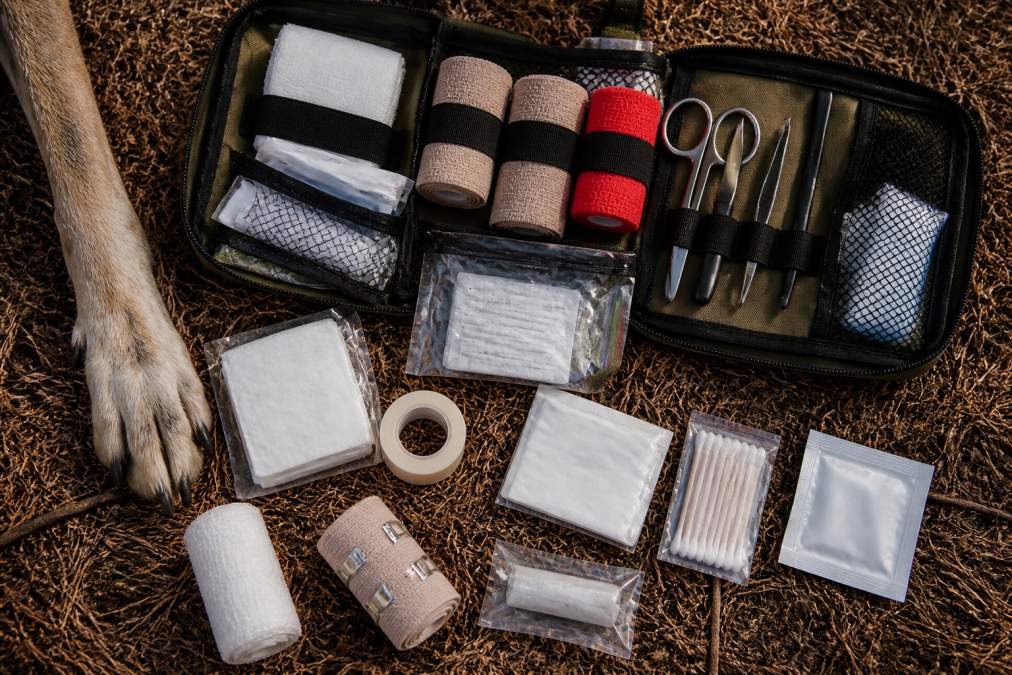
A properly stocked emergency medical kit for hiking dogs balances completeness with portability. You need enough supplies to handle moderate injuries without carrying a full veterinary clinic on your back. The dogsRtreed FIRST-AID MEDICAL FIELD MOLLE PACK weighs just 1.5 pounds and fits in a compact 8" H x 6" W x 5" D size, making it realistic to carry on every outing.

Wound Care and Bandaging Essentials
Sterile gauze pads form the foundation of wound care in the field. You'll want multiple sizes, small 2x2 pads for minor cuts and larger 4x4 pads for significant lacerations. Pack at least a dozen of each. Self-adhering bandages and medical tape secure gauze without requiring your dog to tolerate wrapping, which matters when you're working quickly on the trail.
Vet wrap (self-adhering elastic bandage) is invaluable for securing dressings and providing compression on bleeding wounds. Unlike traditional bandages, it sticks to itself rather than to fur, reducing the chance your dog will tear it off during the hike out. Include at least two rolls in your kit.
Triple antibiotic ointment prevents infection in minor wounds. Apply it to cleaned cuts before bandaging. Saline solution or sterile water serves double duty: cleaning wounds and flushing debris from paws. A small 4-ounce bottle takes minimal space and lasts through multiple injuries.
Bleeding Control and Trauma Response
Moderate to severe bleeding demands immediate action. Blood clotting powder stops hemorrhage in seconds without the sting of traditional styptic powder. The dogsRtreed blood clotting powder works on both animals and humans, making it a smart dual-purpose addition. A single 15-gram container handles multiple serious wounds.
For severe lacerations that won't stop bleeding with pressure and clotting powder, a sterile skin stapler provides emergency wound closure in the field. The dogsRtreed SKIN STAPLER is a single-use, sterile device designed to fire from multiple angles, critical when you're working on an injured dog in awkward positions. It holds 35 staples and can close wounds that would otherwise require evacuation. This is emergency equipment; use it only when bleeding won't stop and professional veterinary care isn't immediately available.
Medical shears (trauma shears) cut through bandages, collars, and harnesses without snagging fur. A quality pair weighs almost nothing and solves problems you can't address with other tools.
Paw Protection and Recovery
Paw injuries are the most common trail injury for dogs. After cleaning and treating a paw wound, you need protection that stays in place during the walk out. pawsRprotected ALL-IN-ONE PAW PROTECTOR BALM applies directly to pads and between toes, forming a breathable protective barrier. The all-natural formula with aloe, hydrating oils, and lanolin promotes healing while preventing dirt and bacteria from entering the wound.
For dogs with torn or severely abraded pads, a protective bootie or wrap prevents further damage. Pack self-adhesive wrap or athletic tape to create a temporary protective layer around the paw. The goal is keeping the injured pad clean and protected until you reach veterinary care.
| Supply | Quantity | Purpose | Weight |
|---|---|---|---|
| Sterile gauze pads (2x2) | 12+ | Minor wound cleaning | <1 oz |
| Sterile gauze pads (4x4) | 6+ | Significant bleeding | <1 oz |
| Vet wrap (self-adhering) | 2 rolls | Secure dressings | 1 oz |
| Saline solution | 4 oz | Wound irrigation | 4 oz |
| Blood clotting powder | 15g | Hemorrhage control | 0.5 oz |
| Skin stapler | 1-2 | Emergency laceration closure | <1 oz |
| Triple antibiotic ointment | 1 tube | Infection prevention | 1 oz |
| Tweezers | 1 | Splinter/debris removal | <1 oz |
| Medical shears | 1 | Cut bandages and gear | 1 oz |
| pawsRprotected balm | 1 container | Paw protection and healing | 3 oz |
How to Treat Dog Paw Injuries on the Trail
Paw injuries demand immediate attention because they affect your dog's ability to walk out. A small cut can become severely infected within hours in a dirty field environment. The key is rapid assessment, cleaning, protection, and monitoring for signs of serious injury.
Assessing and Cleaning Paw Wounds
Stop and examine the injury immediately. Look for the source: is it a cut, puncture, torn pad, or foreign object embedded in the paw? Check between the toes and on the underside of the pad where injuries often hide. If you see active bleeding, apply direct pressure with sterile gauze for 3-5 minutes.
Once bleeding slows, flush the wound with saline solution to remove dirt, debris, and bacteria. Use a gentle spray, aggressive irrigation can damage tissue. For puncture wounds or deep cuts, flush thoroughly. Dirt in a puncture wound dramatically increases infection risk, and you won't have antibiotics available in the field.
After rinsing, pat the paw dry with clean gauze. Examine the wound depth. Superficial cuts that don't bleed heavily and don't gape open can be treated in the field. Deep lacerations, punctures from unknown objects, or wounds that won't stop bleeding require veterinary attention and should trigger evacuation planning.
Applying Protection and Preventing Infection
Apply triple antibiotic ointment to clean wounds. This reduces infection risk and keeps the wound moist, which promotes faster healing. For minor cuts and abrasions, apply pawsRprotected balm instead, the all-natural formula with aloe and lanolin supports healing without the chemical ointment.
Wrap the paw with self-adhering vet wrap or athletic tape. The goal is a protective layer that stays in place during the hike out without cutting off circulation. Wrap snugly enough to keep dirt out but loose enough to allow blood flow. A wrapped paw typically stays protected for 2-4 hours before needing replacement.
Monitor the wrapped paw during the hike. If your dog is limping severely or won't put weight on it, the wrap may be too tight or the injury more serious than initial assessment suggested. If the dog can walk on it with minor limping, you're likely safe to continue to the trailhead and seek veterinary care.
Pre-Made vs. DIY: Which Kit Works Best
The choice between a pre-made kit and assembling your own depends on your comfort level, budget, and how often you use the supplies. Each approach has real advantages.
A pre-made kit like the dogsRtreed FIRST-AID MEDICAL FIELD MOLLE PACK eliminates guesswork. You get a curated selection of field-tested supplies in a compact, organized bag. The bright orange color makes it easy to locate in an emergency. The MOLLE strapping system attaches to your pack or harness without requiring a separate bag. At $109.99, you're paying for convenience and the confidence that you have the right supplies in the right quantities.
The kit comes pre-packed with essentials: sterile gauze, vet wrap, saline solution, blood clotting powder, antibiotic ointment, tweezers, medical shears, and a sterile skin stapler. The inclusion of the skin stapler alone, worth $13.99 separately, makes the kit valuable for serious situations. You also get pawsRprotected "Quick Stick" for paw protection, which handles both pre-conditioning and healing.

A DIY kit costs less upfront if you assemble it gradually. You buy only what you know you'll use, and you can customize contents for your specific dog and terrain. The downside: assembling a quality kit takes research, multiple purchases, and the risk of forgetting critical items. Many DIY kits end up incomplete or include redundant supplies that waste weight.
DIY kits work best for: budget-conscious owners willing to spend time researching; owners who want to customize for specific dog breeds or terrain; people with medical knowledge who can assess their own needs.
If you're building a DIY kit, start with the dogsRtreed products as your foundation. The blood clotting powder ($13.00) and pawsRprotected balm ($21.99) are non-negotiable. Add sterile gauze, vet wrap, saline solution, and medical shears from a pharmacy or outdoor retailer. Budget $60-80 for a functional DIY kit, but you'll spend time sourcing individual items.
Managing Common Trail Hazards and Emergencies
Trail injuries follow predictable patterns, but response protocols vary significantly based on injury type, dog breed, and distance from veterinary care. Understanding how to assess severity, stabilize your dog, and execute the right intervention keeps your dog safe and prevents minor incidents from becoming life-threatening.
Tick Removal and Prevention
Ticks are the most common parasitic hazard on trails. They transmit Lyme disease, Rocky Mountain spotted fever, anaplasmosis, and babesiosis, all serious pathogens that can cause long-term illness or death if untreated. Finding and removing a tick within 24 hours dramatically reduces disease transmission risk, but the removal technique matters as much as speed.
Check your dog thoroughly after every hike. Run your hands over the entire body, feeling for small bumps. Check the ears, between the toes, in skin folds, around the tail, and along the spine where ticks congregate. Ticks often hide in areas where you'd least expect them, and a single missed tick can transmit disease.
To remove a tick, use fine-tipped tweezers to grasp the tick as close to the skin as possible. Pull straight out with steady, even pressure. Do not twist, jerk, or crush the tick, this can leave mouthparts embedded or cause the tick to regurgitate infected fluid into the wound. The mouthparts left behind can still transmit pathogens and cause localized infection. Dispose of the tick in rubbing alcohol (70% isopropyl) or by flushing it down the toilet. Do not crush it with your fingers or attempt to burn it off.
After removal, clean the bite area with antiseptic wipes or saline solution. Apply triple antibiotic ointment or pawsRprotected balm to reduce infection risk and promote healing. Mark the date on your calendar. If your dog shows signs of illness in the next 2-4 weeks, fever, lethargy, loss of appetite, joint swelling, or lameness, contact your veterinarian immediately and mention the tick exposure and removal date. Early antibiotic treatment (typically doxycycline) can prevent serious complications if started within 48 hours of symptom onset.
Prevention is easier than treatment. Check your dog before leaving the trail. Many ticks haven't attached firmly in the first few hours. Brushing through the coat removes loose ticks before they embed. Consider a tick-preventive collar or topical treatment (such as permethrin-based products approved for dogs) before hiking in high-tick areas, though these should be discussed with your veterinarian first, especially for puppies, senior dogs, or those with health conditions.
Snake Bite Protocol and Thermal Emergencies
Snake bites are rare but serious, and response protocol depends on whether antivenom is accessible within the critical window. If your dog is bitten, the priority is rapid evacuation to veterinary care. Antivenom must be administered within 4-6 hours to be maximally effective, though it can still provide benefit up to 24 hours post-bite.
Recognize the signs: sudden yelping or whimpering, swelling at the bite site (which can progress rapidly), reluctance to move, difficulty breathing, or collapse. If you suspect a snake bite, stop hiking immediately and head toward the trailhead or call for emergency evacuation. Keep your dog calm and restrict movement, activity increases venom circulation and systemic absorption. Carry your dog if possible to minimize exertion.
Do not attempt field treatment of snake bites. No tourniquet, no ice, no suction device, no incision. These interventions cause more damage than benefit and delay critical care. Your only job is getting to a veterinarian. Before heading into remote areas where snake bites are possible, identify the nearest veterinary emergency clinic and confirm they stock antivenom for the snake species in that region. Not all emergency clinics carry antivenom, and some species require specific antivenom types.
Heat exhaustion and heat stroke are far more common than snake bites, especially in hunting dogs that work hard regardless of temperature. Signs of heat exhaustion include excessive panting, drooling, weakness, glazed eyes, reluctance to move, or vomiting. Heat stroke, a medical emergency, presents with the above symptoms plus rectal temperature above 104°F, collapse, or loss of consciousness.
If your dog shows signs of heat exhaustion, stop immediately. Move to shade, offer water, and cool the dog by wetting the paws, belly, and ears with cool (not ice-cold) water. Submersion in a cool stream or lake is effective if available. Do not use ice water, which can cause vasoconstriction and trap heat internally. Monitor your dog's breathing and responsiveness. If symptoms don't improve within 10-15 minutes or if your dog shows signs of heat stroke, this is a veterinary emergency requiring immediate evacuation.
Breed-specific vulnerability matters significantly. Brachycephalic breeds (bulldogs, pugs, boxers, Boston terriers) have compromised airways and cannot cool efficiently through panting. These breeds are at extreme risk for heat stroke even at moderate temperatures and exertion levels. Giant breeds (Great Danes, Saint Bernards, Mastiffs) have larger body mass and higher metabolic heat production, making them vulnerable to heat stress. If you own a brachycephalic or giant breed, avoid hiking during warm months, hike during early morning or late evening, and carry extra water. Consider leaving these breeds at home during peak heat season.
Pre-hydration prevents heat stress before it starts. Offer water mixed with a recovery supplement (containing electrolytes and glycerin) 30-60 minutes before activity. Studies on working sled dogs found that pre-hydration with glycerin kept dogs 1-2 degrees cooler during exercise. For a dog whose normal temperature is 101-102.5 degrees Fahrenheit, staying 1-2 degrees cooler prevents heat exhaustion from progressing to heat stroke.

Offer water frequently on the trail, every 1-2 hours depending on temperature and exertion. Many dogs won't drink plain water when stressed or tired. If your dog refuses water, it's a sign to reduce intensity and head back immediately. A dog that won't drink is already showing early signs of heat stress.
Muzzling a Stressed or Injured Dog
An injured or frightened dog may bite, even if it's normally gentle. Pain, fear, and stress override normal temperament. If you need to handle an injured dog's wound, apply a muzzle first to protect yourself and prevent the dog from biting during treatment.
A proper soft muzzle (cloth or neoprene) allows the dog to pant and drink but prevents biting. To apply: hold the muzzle open with one hand, gently guide your dog's snout into it, and secure the straps behind the head. The muzzle should be snug enough that the dog can't shake it off but loose enough to allow panting. Never muzzle a dog that's vomiting or having difficulty breathing.
If you don't have a muzzle, you can create a temporary one using vet wrap or athletic tape. Wrap the tape gently around the snout, leaving space for panting, and secure it behind the head. This is less comfortable than a proper muzzle but prevents biting during emergency treatment.
CPR and Rescue Breathing for Dogs
Cardiopulmonary resuscitation (CPR) may be necessary if your dog collapses and stops breathing or loses consciousness. CPR is rarely successful in the field without professional equipment, but it can maintain circulation long enough to reach veterinary care.
First, check for responsiveness. Tap your dog's shoulder and call its name. If there's no response, check for breathing by watching the chest and feeling for breath at the nose. Check for a pulse by placing two fingers on the inside of the hind leg where the femoral artery runs, this is the most reliable pulse point on a dog.
If there's no pulse and no breathing, begin CPR. For dogs under 30 pounds, use one hand to compress the chest at a rate of 100-120 compressions per minute. For larger dogs, use both hands. Compress the chest at the widest point, pushing down about one-third the depth of the chest. After every 30 compressions, give 2 rescue breaths: close the dog's mouth, seal your mouth around the nose, and blow gently until you see the chest rise.
Continue CPR for at least 10 minutes or until the dog shows signs of life (pulse, breathing, response to stimuli) or until you reach veterinary care. CPR is physically exhausting; if you're alone, you may need to alternate between compressions and breaths or focus on compressions alone if rescue breathing is too difficult.
CPR training through organizations like the Red Cross or veterinary schools is invaluable. A hands-on course teaches you the correct compression depth, rate, and rescue breathing technique far better than written instructions. If you spend significant time in remote areas with your dog, CPR certification is worth the investment.
Emergency Dog Carry Techniques and Trail Evacuation
If your dog is injured severely enough that it can't walk, you need a way to get it out. Carrying an injured dog over rough terrain is physically demanding and risky if done incorrectly. Poor technique can worsen injuries, exhaust you before reaching help, and delay critical veterinary care. The decision to carry, wait for help, or hike out alone depends on injury severity, dog size, distance to trailhead, and available resources.
Assessing Evacuation Urgency: When to Carry vs. Wait
Not every injury requires immediate carrying. Some injuries are serious but stable, and your dog may recover enough to walk slowly with support. Other injuries demand immediate evacuation. Understanding the difference prevents unnecessary exhaustion and poor decisions.
Evacuate immediately (carry or call for help):
- Severe bleeding that won't stop with pressure and clotting powder after 5 minutes
- Suspected snake bite (any bite from an unknown snake)
- Signs of shock: pale gums, weak pulse, rapid shallow breathing, unresponsiveness, or cold extremities
- Suspected spinal injury: inability to move hind legs, loss of bladder/bowel control, or severe pain with movement
- Difficulty breathing or signs of choking
- Suspected heat stroke: temperature above 104°F (if you have a thermometer), collapse, or loss of consciousness
- Severe trauma: hit by vehicle, fall from height, or crush injury
- Suspected poisoning: ingestion of known toxin, or signs of toxicity (seizures, excessive drooling, difficulty breathing)
Stabilize and monitor (may be able to walk slowly):
- Minor bleeding controlled with pressure and clotting powder
- Limb injury with pain but some weight-bearing ability
- Mild heat exhaustion responding to cooling and rest
- Minor lacerations or puncture wounds
- Tick exposure or minor infections
For injuries in the "stabilize and monitor" category, rest for 15-20 minutes in shade, offer water, and assess whether your dog can walk slowly with support. Many dogs recover enough to walk out slowly, which is safer than carrying for long distances.
Stabilizing an Injured Dog for Transport
Before attempting to carry your dog, stabilize the injury to prevent further damage and reduce pain.
For limb injuries: Prevent movement of the injured limb. Use vet wrap or athletic tape to immobilize the limb against the body. For a front leg injury, wrap the leg to the chest. For a hind leg injury, wrap the leg to the body. The goal is to prevent the limb from swinging or bearing weight during transport.
For bleeding wounds: Apply direct pressure with sterile gauze for 3-5 minutes. If bleeding continues, apply blood clotting powder directly to the wound and maintain pressure for another 2-3 minutes. Once bleeding slows, secure the bandage with vet wrap. Do not remove the initial gauze layer, this disrupts clotting. Layer new gauze on top if needed. Movement increases bleeding, so minimize activity before carrying.
For suspected spinal injury: Minimize twisting and bending of the spine. Keep the dog as horizontal as possible during transport. If you suspect spinal injury, avoid lifting the dog into a vertical position. Instead, slide the dog onto a makeshift stretcher (a jacket, sleeping pad, or tarp) and carry the stretcher horizontally. If you must carry the dog, support the entire spine and avoid flexing or extending it.
For shock: Keep the dog warm and calm. Cover it with your jacket, sleeping bag, or emergency thermal blanket if you have one. Shock can be life-threatening, and you need to move quickly to veterinary care while keeping the dog as still and warm as possible.
Carrying Methods for Different Dog Sizes and Injuries
Small dogs (under 20 pounds): A front-carry cradle works well and allows you to monitor your dog's condition. Support the dog's hindquarters with one arm and the chest with the other. Keep the dog close to your body for stability and to minimize movement of injured areas. This position is sustainable for 30-45 minutes before arm fatigue becomes significant. If you need to carry longer, switch arms or take breaks every 20-30 minutes.
Alternatively, use a pet carrier or backpack designed for small dogs. A carrier distributes weight more evenly and frees your hands for balance on technical terrain. Many hiking backpacks have pet compartments that allow the dog to ride high on your back, which is more stable than front-carrying on uneven ground.
Medium dogs (20-50 pounds): A modified fireman's carry distributes weight more evenly across your shoulders and core. Drape the dog across your shoulders with front legs on one side and back legs on the other. Keep one arm under the hindquarters for support and one arm across the chest. This position is sustainable for 45-60 minutes before fatigue sets in. The weight is distributed across your shoulders rather than concentrated in your arms, which is more efficient for longer distances.
For dogs with limb injuries, this carry may be uncomfortable because the injured limb hangs freely. Instead, try a two-arm carry: cradle the dog with one arm under the hindquarters and one under the chest, keeping the injured limb supported against your body. This is less efficient than a fireman's carry but better for injured dogs.
Large dogs (50-90 pounds): You may not be able to carry the dog alone for any significant distance. A single person carrying a 70-pound dog can typically manage only 10-15 minutes before exhaustion becomes dangerous. If the dog can't walk, you need two people or emergency evacuation.
With two people, use a two-person carry: one person supports the front half (under the chest and front legs) while the other supports the rear half (under the hindquarters and back legs). Move slowly and deliberately to avoid jarring the injured dog. Communicate constantly, call out obstacles, uneven terrain, and when you need to rest. Switch positions every 15-20 minutes to distribute fatigue.
Alternatively, create a stretcher using a tarp, sleeping pad, or jacket. Slide the dog onto the stretcher and have two people carry it by the corners or edges. This distributes the dog's weight evenly and is less jarring than a two-person carry. A stretcher is especially valuable for dogs with suspected spinal injuries.
Giant dogs (over 90 pounds): Carrying is rarely feasible. If a giant breed dog can't walk, you need emergency evacuation. Call for help immediately. While waiting, keep the dog warm, calm, and as still as possible. Do not attempt to carry a 100+ pound dog, the risk of injury to yourself and further injury to the dog is too high.
Decision Tree: Carry vs. Hike Out vs. Call for Help
Can your dog walk, even slowly?
- Yes → Support the dog with a hand under the chest or by holding the collar. Walk slowly. Stop every 10-15 minutes to rest and assess. If your dog can walk, this is the safest option.
- No → Proceed to next question.
Is the injury life-threatening (severe bleeding, shock, heat stroke, spinal injury, difficulty breathing)?
- Yes → Call for emergency evacuation immediately if you have cell service. If no cell service, send someone to the trailhead to call for help while you stay with the dog. Do not attempt to carry a severely injured dog alone over long distances.
- No → Proceed to next question.
How far is the trailhead?
- Under 1 mile → Attempt to carry if your dog is under 50 pounds. For larger dogs, hike out and return with help.
- 1-3 miles → Assess your physical ability. Can you carry your dog for 1-2 hours? If yes and your dog is under 50 pounds, attempt to carry. If no or your dog is larger, hike out and return with help.
- Over 3 miles → Do not attempt to carry alone. Hike out and return with help or call for emergency evacuation.
Are you alone?
- Yes and dog is under 50 pounds → Attempt to carry if the injury is not life-threatening and the trailhead is under 2 miles away.
- Yes and dog is over 50 pounds → Hike out to call for help. Mark your location clearly, leave the dog in shade with water if possible, and hike out to call for assistance. A dog can survive alone for several hours. You cannot survive if you collapse from exhaustion trying to carry a large dog solo.
- No (multiple people) → Coordinate a two-person carry or stretcher carry for any size dog.
Minimizing Injury During Transport
Even with proper technique, carrying an injured dog causes additional stress and potential injury. Minimize this by:
Moving slowly and deliberately: Fast movement jars the dog and increases pain. Move at a walking pace, even if you could move faster. Stability matters more than speed.
Avoiding technical terrain when possible: If you can take a longer, easier route instead of a shorter, steeper route, do so. The extra time is worth the reduced risk of falling or jarring the dog.
Taking frequent breaks: Every 15-20 minutes, set the dog down gently and rest. Check the dog's breathing, gum color, and responsiveness. Offer water if the dog is conscious and able to drink. These breaks prevent your own exhaustion and allow you to monitor the dog's condition.
Keeping the dog as horizontal as possible: Vertical positions (standing on hind legs, being held upright) increase pain and stress. Horizontal positions (cradled, on a stretcher) are more comfortable and safer.
Communicating with the dog: Talk to your dog in a calm voice. Many dogs respond to reassurance and calm behavior from their owner. Anxiety increases pain perception and can worsen shock.
Weight and Portability: Building a Field-Ready Kit
The best emergency medical kit for hiking dogs is the one you actually carry. A comprehensive kit that stays at home is useless. Weight and bulk matter when you're already carrying water, food, and gear for yourself.
The dogsRtreed FIRST-AID MEDICAL FIELD MOLLE PACK solves this by keeping the total weight at 1.5 pounds. That's light enough to attach to your pack or harness without noticing it. The compact size fits in a backpack pocket or clips to your belt.
If you're building a DIY kit, aim for under 2 pounds total. Prioritize high-impact items: gauze, vet wrap, blood clotting powder, and pawsRprotected balm. Leave behind redundant items. You don't need five different antibiotic products, pick one and stick with it.
Consider the items you'll actually use. Tweezers are light and useful for splinters and tick removal. A skin stapler is heavy relative to its use case, but it's irreplaceable for severe lacerations. Blood clotting powder is essential for any serious bleeding. Triple antibiotic ointment is standard but pawsRprotected balm does the same job with all-natural ingredients.
Pack supplies in a waterproof bag or pouch. Trail conditions are wet and muddy. Sterile gauze that's been soaked in water is no longer sterile. A waterproof bag protects supplies and keeps them organized.
Test your kit on short hikes before relying on it for serious backcountry trips. You'll learn what you actually use, what you forgot, and whether the kit is truly portable enough for your situation.
Hydration and Recovery for Working Dogs
A dog that's properly hydrated before activity and receives recovery nutrition afterward performs better and recovers faster. This is where many owners miss an opportunity to prevent injuries in the first place.
Pre-hydration matters more than most people realize. A dog that starts a long hike already dehydrated is at risk for heat stress and exhaustion. The dogsRhydrated system's Step 1 pre-hydration supplement is mixed with water and offered 30-60 minutes before activity. The glycerin in the formula absorbs into muscle tissue and carries water with it. This keeps muscles hydrated during exertion, which reduces cramping and fatigue.
During activity, offer water at regular intervals. Stop every 1-2 hours and let your dog drink. Don't allow your dog to drink excessively after hard exertion, small amounts every few minutes are safer than large quantities at once.
After activity, offer Step 2 of the dogsRhydrated system within 30 minutes. This is the critical window for recovery. Muscle cells are primed to absorb carbohydrates during this period. The maltodextrin in Step 2 replaces up to 60% of carbohydrate loss in minutes. This reduces cramping, soreness, and fatigue for the next day's activity.
For dogs with existing paw damage or skin irritation, apply pawsRprotected balm daily. The all-natural formula with aloe and lanolin supports healing and prevents minor issues from becoming serious. Apply 2-3 times per week for maintenance on healthy paws, or daily if treating an existing problem.
An emergency medical kit for hiking dogs isn't insurance that nothing will go wrong. It's the difference between managing an injury in the field and facing a crisis. The dogsRtreed FIRST-AID MEDICAL FIELD MOLLE PACK gives you a proven, portable foundation. Pair it with dogsRhydrated for prevention and pawsRprotected for paw care, and you've covered the most common trail emergencies and injuries. Get started with dogsRtreed and carry the confidence that you're prepared when your dog needs you most.
Frequently Asked Questions
What should be in a dog first aid kit for hiking?
A complete hiking first aid kit for dogs includes sterile gauze pads, self-adhering bandages, antiseptic wipes, triple antibiotic ointment, styptic powder for bleeding control, vet wrap, tweezers for tick removal, a digital thermometer, saline solution for wound irrigation, trauma shears, medical tape, and a muzzle for safety. The dogsRtreed FIRST-AID MEDICAL FIELD MOLLE PACK ($109.99) includes most essentials pre-assembled and weighs just 1.5 lbs, making it portable and grab-and-go ready. Add paw-specific items like pawsRprotected balm ($21.99) for pre-conditioning and healing.
How do you carry an injured dog on a hiking trail?
For smaller dogs, use a cradle carry: support the dog's hindquarters with one arm and chest with the other, keeping the dog close to your body for stability. For medium to large dogs, stabilize any visible injuries first, then use a two-person carry if available, one person supports the front legs, the other the rear. Keep the dog's spine aligned and avoid twisting movements. If evacuation is long, consider fashioning a makeshift sling from a backpack or jacket to distribute weight. Always seek veterinary care immediately after reaching safety.
What are the most common trail injuries for dogs?
Paw pad lacerations from sharp rocks and rough terrain are the most frequent injury. Other common issues include tick bites and embedded parasites, muscle strains from steep terrain, heat exhaustion in warm weather, and cuts from brush and branches. Breed-specific concerns matter too: dogs with shorter legs struggle with rocky terrain, while deep-chested breeds are prone to bloat during intense activity. Pre-hydration with dogsRhydrated ($22.99) reduces heat-related emergencies by keeping body temperature 1-2 degrees lower during exertion.
How do I prevent my dog from getting dehydrated on long hikes?
Offer water frequently during breaks, but structured hydration works better than ad-hoc drinking. Pre-treat your dog with dogsRhydrated Step 1 (glycerin-based pre-hydration) before hitting the trail, studies on working sled dogs showed this keeps body temperature lower and prevents dehydration over multiple days. After intense activity, offer Step 2 (maltodextrin-based recovery) within 30 minutes to replace carbohydrate loss and restore energy. This 2-step system is proven to reduce heat exhaustion risk significantly.
This article was written using GrandRanker